Much like cleaning your house come spring or cleaning out your closet, it's also a good time to go through your make-up and throw out unused or bad items as well.
Mascara should be changed every 3 months. If you have an eye infection at any time, immediately change it then. Once it's exposed to air and your lashes it dries up and collects bacteria. Here's the pro's recommendations:
1. Mascara-3 months if used daily, 6 months if not
2. Concealer-18 months
3. Liquid Foundation-1 year
4. Loose powder foundation-no expiration date
5. Cream eyeshadow-1 year
6. Powder eyeshadow-2 years
7. Lip pencil-3 years
8. Lipstick-2 years
9. Lipgloss-1 year
It's also annoying to have a ton of eyeshadows that you never wear cluttering up your drawer. Also take that time to wipe everything down and organize it. Just remember the clothes rule: if you haven't worn it for a year, you're not going to wear it again--throw it out! That way you now have room to buy NEW colors!! (At least that's my excuse ;)
Showing posts with label makeup. Show all posts
Showing posts with label makeup. Show all posts
Monday, 2 April 2012


Orange Crush
I walked into Sephora the other day and was thrilled with their signage--Orange is the color of the season! I feel like there isn't enough of this wonderful color in the world of make-up. Yes, there are the nail polishes (only recently), and the subtle tones of orange, but I think it's really started to become popular.
A couple weeks ago I was in Superstore and saw that Revlon had a new line of lipsticks out. I was immediately drawn to the packaging (good marketing right there!) because it was so bright and colorful. I picked up the orange one instantly, sampled it and fell in love.

The color is called "Tutti Fruity", and basically it's a Lip Butter--it's very moisturizing with a tint of color, but not too much. The orange is really subtle at first, but if you put layers of it on it will get darker. If you're a little leery about orange lipstick, this is the way to go. It actually looked a little peach/coral.

Pair it with a gold/peachy eye and you're good to go! Check out the other colors as well. There is also a commercial that Emma Stone is in that I'm pretty sure she's wearing this shade:
It's only summer for a short period of time, so brighten up!
A couple weeks ago I was in Superstore and saw that Revlon had a new line of lipsticks out. I was immediately drawn to the packaging (good marketing right there!) because it was so bright and colorful. I picked up the orange one instantly, sampled it and fell in love.

The color is called "Tutti Fruity", and basically it's a Lip Butter--it's very moisturizing with a tint of color, but not too much. The orange is really subtle at first, but if you put layers of it on it will get darker. If you're a little leery about orange lipstick, this is the way to go. It actually looked a little peach/coral.

Pair it with a gold/peachy eye and you're good to go! Check out the other colors as well. There is also a commercial that Emma Stone is in that I'm pretty sure she's wearing this shade:
Tuesday, 20 December 2011
Ho Ho Holidays!
The holidays are finally here!! Good food, drinks and most important--the parties!
This is the time girls everywhere are pulling out all the stops with the glitter dresses, the extravagant hairdo's and the beautiful make-up. This is truly the most wonderful time of the year!
It's the best time to go big. Be daring. This is the time of year where red lipstick is the norm. Lots of people love the look, but can't pull it off for many reasons--they don't have the right shade, they don't have the right preparation, and they don't have the right tools.
It's a process. If you 're going to do a dramatic lip you want it to be the center of attention. It has to look perfect. Here's what I've found to be the best way:
Step 1 begins in the shower. Exfoliate your skin and most importantly exfoliate your lips. You can do this easily with your toothbrush or a homemade scrub consisting of honey and brown sugar.
Step 2 is to do your make-up flawlessly. Every year for the holidays I try to do an old Hollywood look. If you recall, their skin is immaculate. I also have a bit of rosacea and my overall skin tone is pinkish so I make sure it looks faultless. I start with a primer to even my skin before I use foundation, powder, then bronzer. Around my lips I use an eyeshadow primer. It's like foundation, but it's thicker and adheres better. It dries wonderfully. Not everyone has that skin color to use that, so use more foundation around your lips, and slightly on them as well.
Step 3: Always use a lip liner!!! This stops the lipstick from feathering out onto your skin. This is your chance to also make your lips slightly bigger than what nature intended. Only on the bottom lip, and if you're comfortable doing it, outline just right outside the lip line. Anymore will look silly. Fill in liner halfway into lip.
Step 4 is to apply your desired color. I have many reds before I found the perfect one. If you don't have an idea what your skin tone is think of it this way: if you have blueish/purple skin you are a cool tone. If it's yellow, it's warm. Cool tones should go for blue reds, and warm tones are better with the orange hues. If all else fails, go to a MAC or Sephora to find your perfect shade.
It took me a while, but I found a red lipstick that I LOVE! It's the Kat Von D make-up line exclusive to Sephora. It's called "foil" lipstick. The packaging is beautiful, and the color is gorgeous--a beautiful red with pink tones. It's called a foil lipstick because it goes on sparkly and shimmery but is a matte. So this ensures that once it's on, it stays on. I hardly have to reapply.

This year I'll be rocking the vibrant pink at my holiday parties. All of the above steps apply, but instead of using the red lip liner you'll use the "nude"--which is the liner closest to my natural lip color. Again, I have many pinks :)


What if you wanted to do some striking eye looks? Eyelashes are always a great way to go. You can still have the expressive lip with a pair of doe eyes. It really completes the classic old Hollywood look. One of my friends, Erika, recently went to a holiday party and had some really amazing eyelashes. They are called Paperself, and the lashes are made out of paper. Yes, paper! It's a very cool look.
 You can find them at Sephora in a couple different styles as well. They are re-usable if treated with care. They look gorgeous!
What look will you be doing this holiday season?
This is the time girls everywhere are pulling out all the stops with the glitter dresses, the extravagant hairdo's and the beautiful make-up. This is truly the most wonderful time of the year!
It's the best time to go big. Be daring. This is the time of year where red lipstick is the norm. Lots of people love the look, but can't pull it off for many reasons--they don't have the right shade, they don't have the right preparation, and they don't have the right tools.
It's a process. If you 're going to do a dramatic lip you want it to be the center of attention. It has to look perfect. Here's what I've found to be the best way:
Step 1 begins in the shower. Exfoliate your skin and most importantly exfoliate your lips. You can do this easily with your toothbrush or a homemade scrub consisting of honey and brown sugar.
Step 2 is to do your make-up flawlessly. Every year for the holidays I try to do an old Hollywood look. If you recall, their skin is immaculate. I also have a bit of rosacea and my overall skin tone is pinkish so I make sure it looks faultless. I start with a primer to even my skin before I use foundation, powder, then bronzer. Around my lips I use an eyeshadow primer. It's like foundation, but it's thicker and adheres better. It dries wonderfully. Not everyone has that skin color to use that, so use more foundation around your lips, and slightly on them as well.
Step 3: Always use a lip liner!!! This stops the lipstick from feathering out onto your skin. This is your chance to also make your lips slightly bigger than what nature intended. Only on the bottom lip, and if you're comfortable doing it, outline just right outside the lip line. Anymore will look silly. Fill in liner halfway into lip.
 |
| The tools to use: Primer, eyeshadow primer and lip liners in nude and red. |
 | ||||||||
| All my red lipsticks! |

 | |
| The most beautiful color, rightly named Adora. |


What if you wanted to do some striking eye looks? Eyelashes are always a great way to go. You can still have the expressive lip with a pair of doe eyes. It really completes the classic old Hollywood look. One of my friends, Erika, recently went to a holiday party and had some really amazing eyelashes. They are called Paperself, and the lashes are made out of paper. Yes, paper! It's a very cool look.
What look will you be doing this holiday season?
Saturday, 19 November 2011
All That Glitters...
They say diamonds are a girl's best friend, but I beg to differ. Sparkles are my diamonds. They are beautiful, colorful, and all around wonderful.
I was perusing through Micheal's one day and came across the Martha Stewart section. I stopped immediately and like a raccoon, was drawn to the shiny things I saw. 24 glorious glitters in all the colors of the rainbow.


 This set retails at Micheal's for about $44.99 (CAN). They also sell it at Walmart, for a cheaper price. The great thing about Micheal's is their constant coupons, and luckily I had a 40% off one, and gladly used it on this.
Now you may ask what I want to do with all this glitter. Well, I spent a good 5 days just staring at it. Seriously. It's that beautiful. Next, I sent a picture to my good friend who is also my esthetician. She also love sparkles. We knew what we had to do!
A couple years ago we discovered the simple amazing trick to combine loose glitter and gel to make fabulous, sparkly nail polish. It was close to Halloween and I was going as Katy Perry, so I wanted to do something really fun and funky (Katy always has crazy nails!). I wanted RAINBOW nails! Unfortunately we didn't have the time (or enough different brushes) to do the job, so I chose a blue.
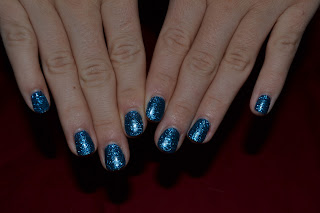
 (I took the nail pictures about a week after they were done, so they are grown out a bit)
So that's one idea you can use this glitter for. Another is for eye make-up. It's super fine so it's not going to clump up. I got this idea from LIT, when years ago I had bought a bunch of glitter at a hefty price. Well, NO MORE! Their "glue" is good to have though if you are going to be using this on your eyes. If you don't have it you can purchase it at Merle Norman for $5 (Calgary), or on their website.
http://litcosmetics.com/
OR you make your own glue from water and sugar, or just straight 7UP. Dip a liner brush in solution, then glitter and sweep across lids for glitter eyeliner. If you'd like to use it as an eyeshadow (the more the merrier!), use a wider brush and dab glitter onto eyelid. This look is brilliant for the holidays!
And for even more wonderful glittery fun, use in your hair. Do your hair up in the chosen style you'd like, spray hair with hairspray, then sprinkle glitter where needed. Spray again with hairspray. Voila!
I was perusing through Micheal's one day and came across the Martha Stewart section. I stopped immediately and like a raccoon, was drawn to the shiny things I saw. 24 glorious glitters in all the colors of the rainbow.


Now you may ask what I want to do with all this glitter. Well, I spent a good 5 days just staring at it. Seriously. It's that beautiful. Next, I sent a picture to my good friend who is also my esthetician. She also love sparkles. We knew what we had to do!
A couple years ago we discovered the simple amazing trick to combine loose glitter and gel to make fabulous, sparkly nail polish. It was close to Halloween and I was going as Katy Perry, so I wanted to do something really fun and funky (Katy always has crazy nails!). I wanted RAINBOW nails! Unfortunately we didn't have the time (or enough different brushes) to do the job, so I chose a blue.


So that's one idea you can use this glitter for. Another is for eye make-up. It's super fine so it's not going to clump up. I got this idea from LIT, when years ago I had bought a bunch of glitter at a hefty price. Well, NO MORE! Their "glue" is good to have though if you are going to be using this on your eyes. If you don't have it you can purchase it at Merle Norman for $5 (Calgary), or on their website.
http://litcosmetics.com/
OR you make your own glue from water and sugar, or just straight 7UP. Dip a liner brush in solution, then glitter and sweep across lids for glitter eyeliner. If you'd like to use it as an eyeshadow (the more the merrier!), use a wider brush and dab glitter onto eyelid. This look is brilliant for the holidays!
And for even more wonderful glittery fun, use in your hair. Do your hair up in the chosen style you'd like, spray hair with hairspray, then sprinkle glitter where needed. Spray again with hairspray. Voila!
Subscribe to:
Posts (Atom)